Showing posts with label caramel. Show all posts

March 6, 2014

Caramel Corn Cookies

No comments:
Pin It!
I'm seemingly incapable of baking anything but cookies recently. 

#sorrynotsorry
 
I'm also seemingly incapable of making food that sounds good right off the bat.  You know those carrot cake cookies?  Well, I already told you how hesitant my family was about those.

 
It was like they were on repeat.
 
"Caramel corn in cookies?  Seriously?"
 
(In all seriousness, my family is incredibly supportive, BUT, they are not adventurous foodies, so my cooking/baking stretches them.  A lot.)

 
I didn't come up with this idea on my own.  My pastor had mentioned (among other things - I do listen to sermons) that he had tried kettle corn cookies from Trader Joe's one time and that he hadn't found them again.
 
I thought that was a really good idea!  We have a tub FULL of popcorn.  You know the ones you get for Christmas from companies you support or supported 20 years ago that still send you those giant metal black holes packed to the brim with popcorn?  I used caramel corn from that.  I wonder what real kettle corn would taste like in cookies ... wow, fair food to the next level!  Anyways, back to the caramel corn.  I personally love caramel corn.  It is one of my favorite treats.  Mainly because there is more caramel than popcorn, but I convince myself it is okay because corn is a vegetable.  Vegetables covered in sugar - that is so the way I roll.
 
So, even though I have been sitting in my cookie loaded corner, shunning the real world of creativity, I 'm thinking I should stick to cookies because the last three or four batches I've made have received rave reviews.  That is not the norm, hence the lack of cookie recipes on this blog (I'm partial to brownies and muffins  and no bake energy bites ;)
 
Even if he doesn't like a lot of foods, my Dad is pretty game to try most anything, and he really liked these.  In fact, he said he was going to go buy another bag (NOT a tub, thank goodness) of caramel popcorn so we could make these again.
 
Guess what is sitting in our pantry right now. 

 
According to my testing panel (and it does consist of a hefty 5-6 people) these tasted like caramel corn, but it was hard to identify.  Like, they said it was kind of like toffee, kind of like caramel bits, but not all the way one or the other.  I think that is because the caramel coating on the popcorn melts into the cookie (which sounds pretty awesome to me) and the popcorn softens while baking, so there aren't traditional crunches of popcorn in your cookie.  The popcorn adds a little chewiness and a little saltiness, which pairs with the sweet and brown sugary cookie base beautifully. 
 
So, maybe you aren't a popcorn-in-your-cookie person.  None of my family was either.  But thanks to a never fail cookie base and caramel coated popcorn, these won the hearts of everyone who tried them. 
 
Plus, they have shock appeal and I love foods with shock appeal :)

 
Caramel Corn Cookies
Recipe Source: The Sweet {Tooth} Life
Yield: 3 dozen cookies

1 cup (2 sticks) butter or margarine, softened
1 -1/2 cups brown sugar
1/2 teaspoon salt
1 teaspoon vanilla extract
2 eggs
2-1/4 cups all purpose flour
1 teaspoon baking soda
2 teaspoons cornstarch
1 cup caramel corn, coarsely chopped

Preheat oven to 350.
Beat butter, sugar, salt and vanilla until combined.
Add eggs; beat well.
Stir in flour, baking soda, and cornstarch.  Stir until all dry ingredients are incorporated.
Fold in caramel corn.
Scoop into one tablespoon balls of dough and place on lightly greased cookie sheet.
Bake for 9-11 minutes.
Let cool.
Enjoy!

January 21, 2014

Snickerdoodle Cheesecake Gooey Bars

21 comments:
Pin It!
Can we talk about how much is going on in these bars?  There is a layer of snickerdoodle gooey cake, then a layer of snickerdoodle cheesecake, then cinnamon chips, then more gooey cake, and finally, caramel sauce drizzled all over.  Can I just say "yum?!"

This was created because Stephen and I tied for last in our bowl sheet competition.  The winner gets to pick the meal, the loser gets to pick the dessert.  Well, Stephen and I tied for last (yes, I'm very proud of it) and we all chuckled/groaned, because there couldn't be more two opposite sets of tastebuds than ours.

I like chocolate. 
I like veggies.
I like pumpkin.
I like lots of spreads and dips and condiments. 
I really like food in general.

Stephen ... doesn't. 

But, he does like snickerdooodles.  And he does like helping in the kitchen.  (Generally, when you get someone to help you, they will be a lot more open to eating whatever you make.  It works, I've tried it many times)  So, Stephen and I had a brainstorm session where I sketched this out, asking for his approval.  He gave it, we made it, the family loved it.  I was impressed this could be as rich and decadent as it was without chocolate!

So let's break this down; the first layer is simply cake mix, butter, and egg mixed together.  It is your standard gooey cake mix base.  Then I added a hefty teaspoon of cinnamon, to give it the snickerdoodle flavor.

Then, there is our cheesecake, adding the smooth and creamy middle layer.  Simply cream cheese, sugar, and cinnamon.  Just make sure your cream cheese is softened, which you can do by letting sit out for 30 minutes or (because I never plan that far ahead) you can cut into 4-6 equal cubes and just heat in the microwave for 30-45 seconds on half power.  Just spread it over the gooey cake layer. 

Finally, we sprinkle cinnamon chips (a new found love!) all over those two layers.  They melt into a river of smooth cinnamon heaven!  Add your reserved gooey cake mixture over that and drown it all in caramel sauce.  For all the layers, this is seriously easy peasy.  

I like rich. 
I like gooey. 
I like cheesecake. 
I like cinnamon chips. 
I like caramel. 

So does Stephen. And so will you. 


Snickerdoodle Cheesecake Gooey Bars
Recipe Source: The Sweet {Tooth} Life
Yield: 12 servings
 
Cake Layer:
1 box cake mix (butter or white)
1/2 cup (1 stick) butter, melted
1 egg
1 teaspoon cinnamon
 
Cheesecake Layer:
1 (8 oz.) box cream cheese (you can use low fat)
1 Tablespoon sugar
1/4 teaspoon cinnamon

Other layers:
1/2 cup cinnamon chips
1/4 cup caramel sauce

Preheat oven to 350. 
Stir cake layer ingredients together.  Spread into a 9x9 pan, reserving one cup  of cake mixture. 
Brag softened cream cheese with sugar and cinnamon. Spread over cake mix layer. 
Sprinkle cinnamon chips evenly over cheesecake. 
Press remaining cake mixture over cinnamon chips. 
Drizzle caramel sauce evenly over reserved cake mixture. 
Bake for 25 minutes. 
Cool. Refrigerate for at least four hours or overnight. 

January 10, 2014

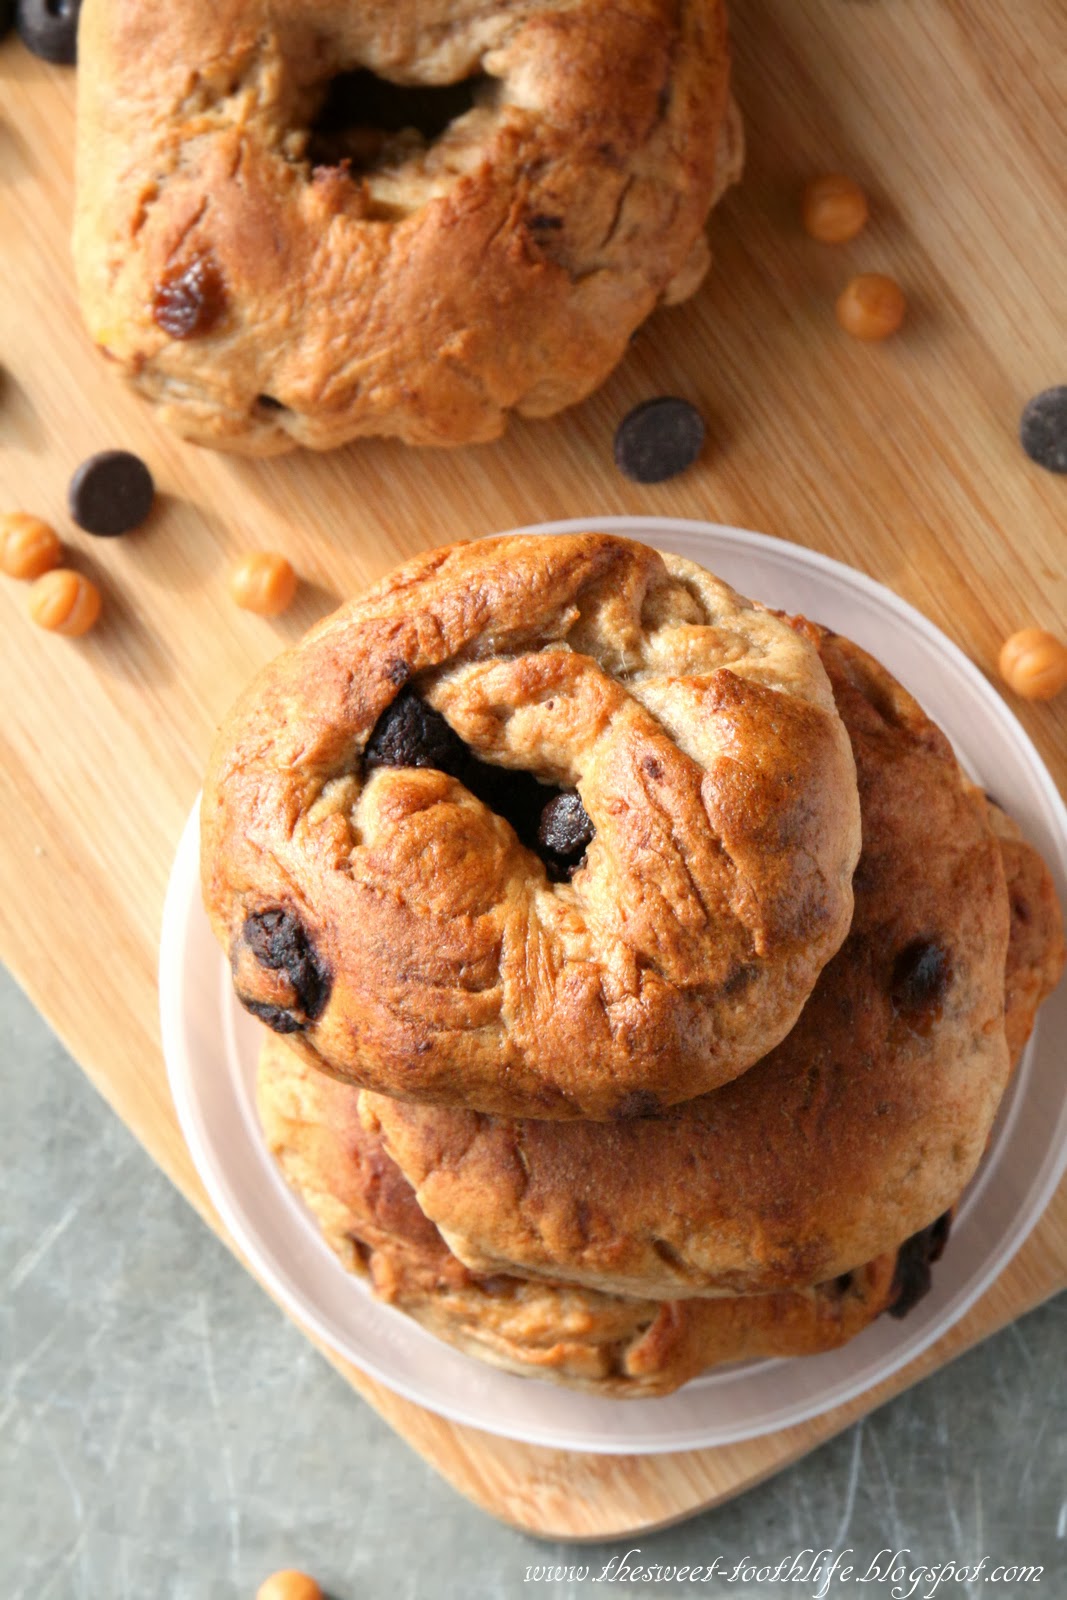
{Whole Wheat} Caramel Dark Chocolate Chip Bagels

13 comments:
Pin It!
You are only eight ingredients away from homemade, from scratch caramel chocolate bagels that give Panera Bread a run for their money. 

 
Sundays are special days.

It is the Lord's day.

It is the last day of the weekend.

It is the day everyone is home.

It is the day we get bagels at church.


(and it is the day of my volleyball practices. All those things mentioned?  I really like Sundays)

Back to the bagels; a couple years ago, we had several gals from our church that worked at Panera Bread.  Panera Bread let them take all their leftover/old breads, bagels, desserts, etc., on Saturday and we've had Panera Bread and coffee every Sunday for many Sundays now.  My siblings always look forward to the bagels.  Oh, and the cookies.  But the chocolate chip bagels are very popular.


I decided to make them at home.  Originally, I was going to do salted caramel and coconut (it was one of my New Year's Resolutions) but after the salted chocolate and coconut popcorn, I decided two salt + coconut recipes in a row was a little too much.

So I added caramel.  

Total win.


I used Kraft's caramel bits, but I bet you could also chop up their caramels. The caramel bits soften throughout the baking and especially after being stored overnight.  The chocolate and caramel kind of melt into the bagel, spreading those flavors throughout the whole bagel. The texture is spot on; chewy edges and soft centers. When they tried these bagels, my family described them as having "excellent flavor and texture"  Guys, do you know how technical that is for them?  Usually I get a "mmff, good" or "it's sweet!"  I was even surprised at how authentic it was. Just like Panera.

I take that back. 

Even better.
 
 
{Whole Wheat} Caramel Dark Chocolate Chip Bagels
Recipe Source: The Sweet {Tooth} Life.  Adapted from Heather's French Press
Yield: 8 bagels

1 package of active dry yeast
2 tablespoon sugar
1 1/4 cups of warm water
1-3/4 cups whole wheat flour
1-3/4 cups all purpose flour
1 1/2 teaspoon salt
1/3 cup caramel bits
1/2 cup dark chocolate chips
 
Dissolve the yeast and sugar in 1/2 cup of warm water and let rest for five minutes. 
Mix together the salt and the flours. 
Add the yeast and the additional water to the flour mixture. 
Fold in the caramel and chocolate chips.
Knead until you have a soft and elastic dough, either by hand or using the dough hook of a stand mixer.  Cover the dough and let rise until doubled, about 1-1/2 hours.
After the dough has risen, divide the dough into 8 balls .
Press into the center of each ball forming a hole, and stretch to form the bagel shape.  Place on a cookie sheet and let rest 30 more minutes. 
Pre-heat the oven 425 degrees.  Bring a large pot of water to a boil.
Boil the bagels - 1 or 2 at a time for 3 - 4 minutes.  (they will float to the top when ready)
Place on baking sheet and bake 20 minutes. 

October 8, 2013

Toffee Caramel Cheesecake

33 comments:
Pin It!
I really wanted to get good photos of these, really I did.  I made this one day, let it sit overnight, and tried to take photos Saturday morning.  I didn't plan super well and only had, like, 5 minutes before we had to leave for the volleyball tournament.  But I knew I had to take them then or there would've be any left after my family got done with it.
 
There's nine of us, so one cheesecake doesn't last very long.  Two days max.
 
 
So by the time I wanted to take good ones, there was no longer a subject for my pictures.  Soooooo you're left with these, which I know are blurry, and way overexposed.  I'm sorry.
 
Don't let my pictures scare you from making this!  It was a huge hit at our house and I also couldn't get enough of it.  Thanks to the caramel topping and the sweetened condensed milk, this cheesecake is super creamy.  That's what I think of first when I think of this; creamy.  It's not overly sweet and the caramel flavor isn't dominating.  Its just enough and the toffee bits add that crunch and mix up the creaminess. 
 
 
Volleyball is more than halfway through!  (You all will be glad that I'll have a new subject line when the season ends! :)  That means there is less than a month until the new baby gets here.  I am so excited about this new sibling.  As sad as it will be when volleyball ends, I'm grateful it ends when it does because I will be able to be at home and enjoy this new baby.  There's a part of me that REALLY hopes my brothers do basketball simply so while they are at games or at practice, I get to hold the baby and not have to share.  Because I love holding newborns.  It could probably count as a hobby.  Unfortunately, my mom is one of those moms that doesn't carry the baby around everywhere, but lets it learn to sit in its car seat and lay on its blanket on the floor (aka, not become best friends with its older sister reliant on us holding it)  I do get it, however, sharing this baby with six other children wanting to hold it as much as I will be hard.
 
 
This new baby will also be different because I will only have a couple years with it.  I won't get to grow up with it the same way I grew up with Luke or Abigail.  That's another reason I would like to spend as much time with him/her as I can.  I don't have a lot of it left. 
I've been asked whether I want a boy or a girl.  This is the first time I really have not cared (maybe because I have enough of each gender already? :)  If its a boy, it will be a great buddy for John Caleb, and I'll be happy.  If its a girl, then I am going to have the time of my life dressing her in adorable clothes and headbands and flowers.  And I'll be happy.  I used to think I wanted twins when I was litte, a girl and a boy, but then I became wise got older and realized that is a TON of work. 
All in all, I'm super excited and can't wait for the beginning of November, even if it means volleyball is over.  (I'll miss it so much though!)


Toffee Caramel Cheesecake
Recipe Source: The Sweet {Tooth} Life
Yield: 16 servings

Crust:
1-1/4 cup graham cracker crumbs
6 tablespoons butter, melted
1 tablespoon brown sugar
3/4 cup toffee baking bits

Cheesecake:
3 (8 oz.) cream cheese (I used low fat), softened
1 (14 oz.) sweetened condensed milk
3 eggs
1 cup caramel ice cream topping
 
Toffee bits for garnish (about 1/2 cup)
 
Preheat oven to 325 degrees.  Line a 9 inch springform pan with parchment paper.  Set aside.
 
Combine graham cracker crumbs, butter, and brown sugar; stir until combined.  Press into prepared pan.  Bake for 12 minutes.  Let cool.  Once crust is cooled, sprinkle toffee bits evenly over crust.  Set aside.
 
While crust is cooling, beat cream cheese and sweetened condensed milk together for several minutes, until smooth.  Add eggs, one at a time, and beat well after each addition.  Beat in caramel ice cream topping.  Pour over crust. 
 
Prepare a water bath by filling a 15x10x2 inch jelly roll pan with 1/2-1 inch water.  Place cheesecake in it and bake for 75-80 minutes.  Let cool on a wire rack for at least an hour before chilling for six hours or overnight. 
 
Sprinkle with toffee bits before serving.  Enjoy!
 
I've got you covered when it comes to cheesecake!


September 28, 2013

Caramel Apple Granola

22 comments:
Pin It!
Everything about this granola is right.

Clumpy, sweet, crunchy, chock full of autumn flavor and healthy to boot. 


Let's break down why this granola is different than all the other apple granola recipes out there. 

I used egg white because I read it helps granola clump more. Since the clumps are my favorite part, I decided to try it, just to see what would happen. It did turn out clumpier, but it might be from not stirring it as much in between bake times. Who knows ... it does give extra protein, I guess! ;)

 
I shredded the apples vs. chopping them just to see what it would turn out like and I really liked the result. The granola is a little chewier in some places because of the apple shreds, but it gives it a stronger apple flavor and more consistent texture. 

I used Rice Krispies. They truly make it crispier!  I've started mixing them into all my granola because of that. 

Finally, I don't know if you can truly call this a caramel sauce, but it's close enough for me.  I cooked coconut oil, brown sugar, honey, and spices together and by iitself, the sauce is strongly spiced and very sweet, but distributed over 6 cups of oats and Rice Krispy cereal, it mellows out into toasty warm granola.  I do believe the way I made it this time have it a deeper flavor boost than others times I've tried this.
 
 
There you have it!  What are you waiting for?  This stuff is so good and healthy for you. I've snacked on if for days (in fact in eating it right now ...) and I love that it fills me up.  If you're gonna eat an apple for breakfast, this is the way to do it!
 

Caramel Apple Granola
Recipe Source: The Sweet {Tooth} Life 
Yield: 6-7 cups

1/4 cup coconut oil
1/2 cup brown sugar 
1/2 cup honey
1 teaspoon cinnamon 
1 teaspoon nutmeg 

1/2 cup unsweetened applesauce
1 teaspoon vanilla 
1 egg white 

4-1/2 cups oats (add more if it seems too soggy) 
1/12 cups Rice Krispy cereal 
2 medium apples, shredded 

Add ins: raisins and walnuts 

Preheat oven to 325. 

For caramel: Combine first five ingredients in a medium sized pot. Bring to a boil and cook over medium heat until slightly thickened, about two minutes. Remove from heat and let cool for a couple minutes. 

In a large bowl, whisk applesauce, vanilla, and egg white until combined and frothy. Pour in caramel mixture and stir until combined. Add oats, Rice Krispy cereal, and shredded apples and stir until all the oat mixture is coated. 

Spread on two lightly greased baking sheets and bake for 30 minutes. Stir granola and then bake for 10-15 more minutes or until browned. Let cool for at least a couple hours before storing. 

Want more apples?


And then Ms. Jocelyn and Ms. Aimee from Inside BruCrew Life and Shugary Sweets (respectively) had an apple week this past week!  Go check their recipes out. In dying to try all of them (especially the caramel apple bars and the pound cake!)

Life has really picked up speed the last couple weeks and I haven't had as much time for the blog world.  The posts may be shorter and not as often, but that doesn't mean I love it any less!  If I seem MIA, I'm probably taking a physics test or at a volleyball game:)  The most exciting that happened this week was family pictures last night and an all day volleyball tournament today.  Have you had a busy week? 
Hugs,
Mary Frances

September 1, 2013

Caramel Funfetti Cake Batter Puppy Chow

24 comments:
Pin It!
As if puppy chow wasn't addictive enough.


This is the best puppy chow I've eaten. Seriously. Even better than the peanut butter butterscotch pretzel puppy chow.

The caramel coating is thick, yet the Chex remains crunchy. And you've got to love cake mix and sprinkles. The batch was gone like *that.*  Even Stephen asked for a big serving and he doesn't like puppy chow. Neither does Mom, but they both really liked this. You don't miss the chocolate and peanut butter at all. And that's saying a lot! 


I get giddy over sprinkles. They just, oh, don't they make me happy!  You know what also makes me giddy?  Really good stories. I watched North and South this weekend and just loved it. Oh my goodness, the plot was complicated in the best sense possible. There was nothing predictable about it and I was on pins and needles much of it. It was fairly intense. The main characters are under a lot of stress in different ways. Their feelings are realistic and you come to feel strongly, good or bad, for them. I often felt like strangling Margaret, one of the main characters, although she did what she believed best regardless of  anyone else's opinions.  But she masked her emotions so well, you were like, "just cry or laugh or something!" and she tended to be very shortsighted.  I think it was hard because you felt bad for both the ominous mill owner, Mr. Thornton and the tough worker Nicolas. What I liked most was you came to really respect the characters and the very real social and financial struggles that would've been going on in this period.  And there is the constant question of, you know these two people are going to get married, but how on earth is it going to happen?  They obviously do not like each other:) The end was quite the shocker, but it had to be, because it was tying up half a million loose ends!  North and South was clean, gripping, and I loved every bit of it.  (I feel like my summary is completely inadequate, though) 


The best part was Anna K. and I were massaging each other's backs during it and during tense scenes, my fingers were digging into her poor back!  The best part was even those who had watched it squealed along with the rest of us at scarier parts:)  And of course, laughed our heads off at Fanny. You MUST watch this movie. It is worth every bit of the four hours. Every single one. 


We ate puppy chow while watching North and South.  So make this puppy chow and watch the movie. You can thank me later. 


Caramel Funfetti Cake Batter Puppy Chow
Recipe Source: The Sweet {Tooth} Life
Yield: 8 cups

1 (11 oz.) bag caramels
3 tablespoons butter
2 tablespoons water
8 cups Chex cereal
2 cups cake mix (I used butter cake mix)
Sprinkles (I used about 1 cup)

In a large pot, melt caramels, butter, and water over medium heat and stir until smooth, about 5 minutes.  Add Chex to pot and stir until Chex is coated.  Combine cake mix and sprinkles in a gallon sized bag and add half of caramel Chex mixture.  Toss to coat and then spread on a baking sheet to cool.  Repeat with remaining caramel Chex mixture and cake mix/sprinkles mixture.  Enjoy!

 
Want more puppy chow?


More sprinkles?


Happy Labor Day Weekend!
 

July 8, 2013

Browned Butter Coconut Caramel Popcorn Blondies

17 comments:
Pin It!
I have only one word for these bars.

Gooey-sweet-chewy-coconut-caramel-heaven.

Don't laugh.


I've become the subject of many jokes among my friends.


The first one concerns my hand sanitizer. I used to be kinda sorta obsessed with it. Like, even my acquaintances remembered me for it. Yes, I am a clean freak (although my dad thinks otherwise. After watching me bake, he decided if we did have a dog, it would be so fat from eating everything I drop and splatter) Yes, and maybe a germiphobic, but I have gotten much better. Meaning Germ-X isn't an extension of my hand anymore. However, my legacy lives on. At a volleyball tournament last year, there was a gift bag for our team and in it was a Bath n' Body hand sanitizer. I immediately received it and I hadn't even gotten to look in the bag yet. "Mary Frances, this is perfect for you!"  

Gee thanks:)


One of my friends got me half a dozen little Bath n' Body sanitizers for my birthday last year and attached a little note as to their specific purpose. One was for my purse, another for my elbow (don't ask!) and another for after killing spiders. I laugh at that one now, because I would have to kill a spider in order to use the hand sanitizer. I really don't like spiders. However, you all will be proud to know I have improved in that area too. I now squash spiders without squealing and practically bathing in sanitizer afterwards. (See, that friend knows my needs well!)  Ok, I'll kill it provided its a little spider. I still don't mess with the big ones. That's why I have brothers. Anyways, I still adore those little scented bottles of germ annihilators. They're just the best. My favorite scent right now is Island Margarita. 


And then there's the joke that I have the body of a 90 year old. Some part of me is constantly put of whack. Right now, it's a lot of things. Like both my ankles, my back, my hip (again! ... *sigh*) my jaw and my hand. The hand will heal, I do know that.  First I burned it by picking up the 350 degree glass pan of these blondies without hot pads. Then they got really calloused from swinging a golf club several hundred times.  My jaw?  Well, I'll probably have to get a splint for that. My hip (ugg, touchy subject) has bothered me off and on for years and lovely me gets to start rehabbing it. Again. Everything else I get to "just let heal."  Yeah. My ankles are new and I'm not sure what's up with them, but I can't run and that's really disappointing. Not that I run a lot anyways (read not at all) but I wanted to keep up conditioning for volleyball. My annoyingly wise ex trainer mother advised me to rest and let it heal now when there is no need to "push through the injury."  


So I baked instead of doing whatever I normally do that hurts my ankles. And back. And ... Oh just forget it. I decided, I needed something gooey. With caramel. And coconut. Oh yeah, popcorn is good, too. 


These bars have so much going on, it's crazy. There is an incredibly soft blondie base that takes advantage of browned butter to give it maximum flavor. Browned butter was new to me, but I was blown away by how such a simple trick adds so much depth to a recipe. So much deeper and richer and all you have to is, well brown your butter!  Melt it and let it boil until it is a deep amber color. Don't cheat on it, let it cook, but do watch it closely. We want brown butter, not burned butter. There is a difference. 

And the caramel!  Adapted from the peanut butter caramel sauce, this one hits home. It is thick and gooey and sticks the popcorn and coconut to the blondies, melding it all together. Caramel is so good and this sauce is sooooo simple. Only four ingredients!

Pop up a couple cups of popcorn, add some coconut and pour your caramel sauce over it all. Bake it a little longer, let cool (yes, otherwise you will be dealing with a gooey sticky hot mess) and then dig in.  

My dear mother, chocolate lover (even more than I!) forgave me for putting popcorn in her blondies because of how soft and gooey they were. They do firm up after about 12 hours, but the first few might be a little rough. Did I mention a hot mess? Me and mom love those. :)


So there you have it, coconut and caramel, popcorn and blondies, and a whole lot of sweet, gooey goodness - and no, I'm not joking.

Browned Butter Coconut Caramel Popcorn Blondies
Recipe Source: The Sweet {Tooth} Life.  Blondie base adapted from Sweet Treats and More
Yield: 12-16 servings

Blondie
1/4 cup butter
1/4 cup coconut oil
1 cup brown sugar
1 egg
1 teaspoon vanilla
1 cup flour
1 teaspoon baking powder
1/4 teaspoon salt
1/2 cup shredded sweetened coconut

Toppings:
3 cups popcorn (3 tablespoons unpopped kernels)
1/2 cup shredded sweetened coconut

Caramel:
2/3 cup milk
1 tablespoon cornstarch
1/3 cup brown sugar
1 teaspoon vanilla

Preheat oven to 350. 

In a small saucepan, melt and brown butter. Let cool for a minute and then whisk in coconut oil and sugar. Whisk in egg and vanilla. Stir in the flour, baking powder, and salt. Once combined, stir in coconut and spread in a greased 9x9 pan. Bake for 10 minutes. 

While blondies are baking, pop the popcorn. Toss popcorn with the coconut and set aside. 

For caramel, whisk cornstarch into a couple tablespoons if milk. Stir in rest of milk and sugar. Stir on medium heat until thickened. Stir in vanilla. 

Once the 10 minutes are done, sprinkle popcorn mixture over blondies. Pour caramel sauce over popcorn and return to the oven. Bake for 10 more minutes. 

Let cool for several hours before cutting. Store leftovers in an airtight container. Enjoy!

June 20, 2013

Caramel Toffee Pecan Ice Cream Cake

18 comments:
Pin It!
My family is kind of odd. My dad doesn't like chocolate, but I've gotten used to that. But recently I learned something that stopped me dead in my tracks. My grandma doesn't like ice cream. 

Please explain to me how that is possible?!  

How could anyone not like ice cream?!


Summer is my excuse to eat ice cream at least twice a day. That cold and creamy and sweet ice cream is just so good. For Father's Day, I updated ice cream and layered it in a freezer pleaser cake. It was a wonderful way to end a Father's Day filled with outdoor stuff.  For Grandmothers Day? ... Umm, carrots?  (Kidding, really.  I would never give my grandma carrots. Maybe Pumpkin Carrot Cake though ...)

This cake has three layers: cookie crumbs, ice cream, toffee pieces, and cool whip. The beauty of this recipe is that it uses store bought ingredients. Less work, less time, but still a stunning dessert. You could make the cookies and ice cream from scratch ... but really, get a life!  One that involves eating this!


Say hello to Caramel Toffee Pecan Ice Cream Cake. 
 
You people are a lot more polite than I!  I just ignored formalities and ate my slice like pizza in 2 bites. And then I ate the rest if my sisters slice and then my brothers pecans. Hello probably would've been a nice thing to say. But this is obviously optional. 

Toffee is incredible stuff. It makes this cake pie ice cream (what do I call this?) so good. It is crunchy and sweet and pairs perfectly with the buttery shortbread and creamy ice cream. 


Now, there is a little warning that goes along with ice cream cakes. I have read so many blog posts about what a pain ice cream is to spread. Having made this twice, I can attest to that!  Because you let the layers freeze in between spreading, the second layer of ice cream will be easy since it will have had been since it had been sitting our for a while. 

To avoid having the outside of the ice cream box soaked with liquid ice cream and the inside frozen solid, I would recommend dividing your ice cream between two bowls and letting it sit for about 15 minutes, stirring occasionally.  This will guarantee the ice cream will soften evenly. Your goal would be soft serve consistency, but don't worry if it doesn't work completely.

Mines didn't because I'm not an incredibly patient person AND my dad was almost home while I was making it as a surprise. It doesn't have to be perfect.  I mean, this is ice cream! Who doesn't like ice cream?!

Just pretend I never told your about my grandma.


Caramel Toffee Pecan Ice Cream Cake 
Recipe Source: The Sweet {Tooth} Life.  Adapted from Taste of Home.
Yield: 12-16 servings

2 tablespoons butter
1 cup Heath toffee bits
6 cups (12 oz.) butter pecan ice cream
8 oz. Cool Whip (regular or lite)

Crush cookies into crumbs, either by hand or using a food processor.  If using a food processor, add butter to crumbs and process until combined.  If using hands, place crumbs in a large bowl and stir in melted butter.  You will have 2-/12 cup crumbs.  Press 1-1/4 cup crumbs onto bottom of greased 9 inch springform pan.  Sprinkle 1/3 cup toffee bits over crust.  Spread 3 cups softened butter pecan ice cream over crust.  Freeze for 10-15 minutes.

Remove cake from freezer and press remaining crumbs on top of ice cream layer.  Sprinkle another 1/3 cup toffee bits on top of crumbs.  Spread remaining 3 cups of softened ice cream on top.  Let freeze for 10-15 more minutes.

Remove from freezer and spread softened cool whip over ice cream layer.  Sprinkle with remaining 1/3 cup toffee bits and cover.  Freeze for at least 15 more minutes or until ready to serve.

To serve, remove from freezer 5 minutes before to let soften.  Drizzle with caramel sauce if desired and serve.

Notes:   To avoid having the outside of the ice cream box soaked with liquid ice cream and the inside frozen solid, I would recommend dividing your ice cream between two bowls and letting it sit for about 15 minutes, stirring occasionally.  This will guarantee the ice cream will soften evenly. Your goal would be soft serve consistency, but don't worry if it doesn't work completely. 

Another stunning springform pan dessert?  Peanut Butter Oreo Mousse Torte!


Need more toffee?  This Toffee Crunch Pound Cake will definitely be enough!


My Chocolate Toffee Pretzel Cookie Cups are super soft cookies stuffed with chocolate chips, pretzels, and (you guessed it) toffee!  Baked in a cupcake pan to ensure ultimate softness.

June 14, 2013

Peanut Butter Snickers S'mores Cheesecake Bars {Gluten Free!}

8 comments:
Pin It!
Did you read that whole title?  Maybe we should go over it again:

Peanut butter

Snickers. 

S'mores. 

Cheesecake. 

Bars.


Okay, I really can't look at these pictures much longer. I'm craving another batch. 

I made these at Chloe's house during a baking day.  If you haven't checked out her pretzels DO IT RIGHT NOW. They are so good and the recipe is foolproof. While she made pretzels, I was making this. At one pint, she looked at me and giggled. "Do you know what you are doing?"

Uh no!  I was making this up on the fly!  And you know what?  This is one of my favorite on the fly creations to date.  Since I can't think of a creative way to tell you all the reasons this is incredible, I'll just make a list. 

1. The peanut butter cookie dough gives a firm base to this dessert and packs a powerful punch if peanut butter. (Say that five times fast!). Only five ingredients and a breeze to whip up. 

2.  The chocolate cheesecake is so creamy, but not very thick so it doesn't overpower the other flavors. The smooth texture contrasts the next layers wonderfully. 

3.  The peanut butter caramel sauce!  Oh my goodness, THIS was my favorite part of these bars. Very thick and smooth and did I mention peanut butter!?!?  Make this. It is so good. 

4. The peanuts and marshmallows. These are simple to sprinkle on top and they add so much. The peanuts add crunch and some color and the marshmallows add a sticky sweetness unique to them and s'mores flavor.

It truly is a texture and flavor party. One where everyone knows the steps to the dance! :)  And although it may sound complicated, it really isn't. You may be washing more than one bowl, but it comes together relatively fast and is completely worth it. I mean, just look at it!


Geez, I told you all I can't look at these without wanting one. You probably want the recipe now, don't you.  

Before I give it to you, I want to tell you one more thing about this recipe: it is gluten free!

It wasn't planned that way and I am not gluten free, but for all who are, you can eat these bars!  I have gluten free friends and I'm never sure what to bring (I'm sure they get tired about the 5 ingredient on cookies that make up the base!) but now I do!  Talk about a really pleasant surprise!

Peanut Butter Snickers S'Mores Cheescake Bars {Gluten Free!}
Recipe Source: The Sweet {Tooth} Life
Yield: 12-16 servings
Peanut Butter Cookie Layer
1/2 cup peanut butter 
1/3 cup brown sugar
1 egg white
1 teaspoon baking soda 
1/2 teaspoon pure vanilla extract
1/4 teaspoon salt 

Chocolate Cheesecake
8 oz.low far cream cheese
1/3 cup sugar
2 tablespoons cocoa powder
1/3 teaspoon pure vanilla extract

Peanut Butter Caramel Sauce 
1/3 cup sugar
1 tablespoon cornstarch 
2/3 cup 2% milk
1 teaspoon pure vanilla extract 
1/4 teaspoon salt
1 tablespoon peanut butter 

Toppings:
1-1/2 cups mini marshmallows
3/4 cup plain peanuts    

1. Preheat oven to 350. Lightly grease 9x9 pan. 

2. For cookie dough: stir peanut butter and sugar together. Beat in egg and vanilla for a minute, until smooth and combined. Stir in baking soda and salt. Press into pan and place in refrigerator. 

3. For cheesecake: Bear cream cheese, sugar, cocoa powder, and vanilla for 1-2 minutes, or until smooth and creamy. Spread over cookie dough. 

4. Bake pan with cookie dough and cheesecake for 25-30 minutes. 

5. While the cheesecake is baking, make the caramel sauce. Combine sugar and cornstarch in a small pan and whisk milk into the sugar and cornstarch until smooth. Cook on medium heat for 5 minutes, stirring constantly, or until caramel reaches desired consistency. Remove from heat and stir vanilla, salt, and peanut butter. Set aside. 

6. Sprinkle mini marshmallows and peanuts over cheesecake and drizzle caramel sauce (you may need to heat it in the microwave for a couple seconds) over marshmallows and peanuts. Broil for 2-3 minutes or until marshmallows are puffed and melty. 

7. Let cool and then refrigerate for at least an hour before serving. Store leftovers in refrigerator. 

If your family doesn't want marshmallows, feel free to bake through step 5 and just drizzle the caramel on the bars as pictured above!  Enjoy!


Or try these Snicker's Birthday Cookies!  Stuffed with peanuts, chocolate chips, and caramel, they have the flavors of a Snickers without an actual Snickers.  The caramel keeps this INCREDIBLY soft!


More peanut butter?  Just check out this post!

DMCA.com Protection