Showing posts with label dairy free. Show all posts

March 19, 2014

Vegan and Flourless Peanut Butter Fudge Bars

No comments:
Pin It!
Remember these cookies?

I loved them so much, I made them into bars.  And I doubled the chocolate.


You are welcome.


I've been a major peanut butter and chocolate kick recently.  I think it is all I have been eating.

Oh yeah, there is spinach too, but chocolate and peanut butter have taken over.

If you have to ask why, then go and bake a batch of these and then we can talk. 

Good deal?


I made my Healthy Reese's Fudge which was arguably much healthier than an actual Reese's, but it still wasn't quite what I wanted in a "creatively healthy" chocolate peanut butter dessert.  Ever since I made those aforementioned peanut butter cookies from chickpeas (and had success!) I couldn't get them out of my mind. 

Beans + peanut butter + sweetener = shockingly good.

So this time, I added a couple tablespoons of cocoa powder and spread a dairy-free-from-scratch-chocolate on top.  Peanut butter fudge cookie bars meets super smooth chocolate.

I'm good at this pairing up thing, huh?


Speaking of cocoa powder, I about had withdrawals the other day.  Since I can't have regular chocolate chips, I've been using cocoa powder and sweetener all.the.time.  I told one of my friends I eat 1/2 cup a day.  That might be an exaggeration, but only slightly. 
 
When I got out my cocoa powder container and had to bang it on the counter to get the last teaspoon out (note: don't try this at home - cocoa powder blows everywhere!) it ranked as one of my top cooking crisis's.  I live, sleep, breathe chocolate (NOT cocoa powder, already tried that.  Doesn't work) and besides, peanut butter needs a friend.
 
My awesome Dad went to the store and bought me a can of cocoa powder. 
 
{He's pretty awesome.  He doesn't even like chocolate.}


My cocoa powder is well loved and is used twice in this recipe.  First, in the base, but the dominant flavor is still peanut butter.  Don't worry, there are undertones of cocoa throughout every bite.
 
And then there is my favorite part!  That topping tastes like I melted chocolate chips and poured it over the top.  But it is only coconut oil, honey, and (yep) cocoa powder.
 
Are you mind blown?  I still am!  I think it is the coolest thing!  Because of the coconut oil, it solidifies at room temp and becomes like a slab of chocolate.  On top of a slab of peanut butter fudge bar.  You can store these at room temp, but I highly recommend refrigerating them.  It guarantees that the peanut butter layer stays moist and fudgy and the top layer remains smooth and firm. 
 
Please believe me when I tell you that this doesn't taste like beans.  It tastes like peanut butter and chocolate fudge.  You do bake the base, but it remains so fudgy that we can safely call it fudge.  The beans and peanut butter combine to create a filling and satisfying dessert that tastes like dessert!


Vegan and Flourless Peanut Butter Fudge Bars
Recipe Source: The Sweet {Tooth} Life
Yield: 12-16 servings

Peanut Butter Bars:
1 can (15.25) fully cooked chickpeas
1/2 cup peanut butter
1/3 cup honey *maple syrup for strict vegans*
1/4 teaspoon each, baking powder, baking soda, and salt
2 tablespoons cocoa powder

Chocolate Topping:
2 tablespoons coconut oil, melted
3 tablespoons cocoa powder
2 tablespoons honey

Preheat oven to 350.
Rinse chickpeas in cold water.
Blend in a food processor until mostly smooth.
Add honey and blend again.
Add peanut butter and pulse a few times.  Don't blend too much or your peanut butter will seize up.
Remove blade and stir in baking powder, soda, salt, and cocoa powder.
Spread into a lightly greased 9x9 pan.
Bake for 12-14 minutes or until toothpick inserted comes out clean.
Let cool.

Related Recipes:

Vegan Flourless Peanut Butter Chocolate Chip Cookies


This post might be linked up at any of these parties.


March 17, 2014

Salted Whole Wheat Chocolate Chip Muffins

1 comment:
Pin It!
Sweet whole wheat muffins with a tender crumb and melty chocolate chips!  The salt on top is optional, but highly recommended as it brings out the chocolate - oh, and there is no butter or cow's milk; these are dairy free!

 
I am addicted to Foodgawker.
 
It is so fun to look through all the beautiful photos of creative food!  Anytime I need inspiration, I go there.  It promises quality pictures and a wide variety of recipes.  And there is no weeding through hundreds of the same recipe on Pinterest because it happens to be incredibly popular.  Don't get me wrong, I am also a major Pinterest junkie, but Foodgawker makes my little food blogger heart very happy.
 
I found this recipe from Pretty Simple Sweet and learned so much from her post!  She revealed all the secrets to a bakery style muffin.  And as you can tell, they work!


Go read the whole post (her photos are really pretty as well) but I will share the one trick that stood out to me.  It makes perfect sense and works like a charm! 
 
Want tall, domed muffins?  Begin baking them at a higher temperature and after a few minutes, lower it to the temperature. This way, the muffins rise quickly and the outside edges will set faster than the center, causing the muffin to have a peak.  Then, they can finish baking at the lower temperature so the edges don't get too brown.  I don't like flat muffins, I mean, that domed top is the best part!  Sometimes, I'll just eat the top part ... please tell me I'm not the only one.


Ah, yes, the top part.  That is straight kosher salt.  You could definitely use coarse sugar, we just never have it on hand.  And I love the way it looks on baked goods. 
 
If you aren't into the sweet and salty, omit it or use coarse sugar, I won't judge.  I bet it would amazing!  But I love getting the mini chocolate chips and the salt together.  It really brings out the chocolate and adds that addictive saltiness.  My family was split on this, so really, it is up to your personal preference.  It isn't the make it or break it ingredient, but it is what makes this recipe different. ;)


Thanks to canola (or coconut oil) and dairy free chocolate chips, these are friendly to any lactose intolerant diets.  Even better, you don't miss the dairy!  As far as chocolate chip muffins, this is my favorite recipe to date. 
 
Using mini chocolate chips spreads out the melty chocolate pockets on the inside of the muffin, making these extra delicious while warm. 
 
They are perfectly domed, with the crusty, bread reminiscent top that bakeries are known for. 
 
They are lightly sweetened, making them feel dessert worthy, when in reality, you could totally eat one for breakfast.  They're healthy, with only 2-1/2 tablespoons of oil between six hefty muffins, which are 100% whole wheat. 
 
And even though they are whole wheat, they aren't dry or flat. 
 
Finally, aren't they just about the prettiest things you've ever seen?


I might just be a tad bit obsessed.

Salted Whole Wheat Chocolate Chip Muffins
Recipe Source: The Sweet {Tooth} Life.  Adapted from Pretty Simple Sweet
Yield: 6 muffins

1 cup whole wheat flour
1-1/4 teaspoon baking powder
1/3 cup sugar
1/8 teaspoon salt
1/2 egg
1/2 cup almond milk*
2-1/2 tablespoons canola oil (or melted coconut oil)
1/2 teaspoon vanilla extract
1/3 cup Enjoy Life chocolate chips**

Topping (opt):
Enjoy Life chocolate chips
Kosher salt

Preheat oven to 425F degrees.  
Grease12 muffin cups.
In a large bowl sift together flour, baking powder and salt.
Add sugar.
In a medium bowl, mix the egg with the milk, oil and vanilla extract.
Pour the wet ingredients into the dry ingredients and fold with a wooden spoon or a rubber spatula just until combined. Do not overmix. The batter should be quite thick and lumpy. Fold in chocolate chips.
Divide the mixture between the muffin cups almost all the way to the top. Bake for 3 minutes and then reduce the oven temperature to 375F/190C and continue to bake for an additional 12-17 minutes (this is for standard size muffins. See post notes for jumbo and mini muffins baking times) until a toothpick inserted into the center of the muffin comes out clean. Cool for 10 minutes and then move to a wire rack to cool completely.

*If you aren't lactose intolerant, you can substitute regular cow's milk. 
**If you aren't lactose intolerant, you can substitute regular mini chocolate chips.

 
More muffins!  (I think they are my favorite thing to photograph)


March 13, 2014

Healthy Reeses Fudge

1 comment:
Pin It!
It's Thursday and I need some motivation to finish the week out!  Are you in the same boat?

How does a Reeses sounds?

How does a HEALTHY Reeses sound?  Now we are getting somewhere, eh? ;)

 
Did you know I didn't like peanut butter for the first 11-12 years of my life?  I think it was from one too many peanut butter sandwiches  (I also don't like grape jelly.  Never have, never will as far as I'm concerned.)
 
So, since I didn't like peanut butter, I obviously didn't like Reeses.  I began playing volleyball my 7th grade year and in junior high, we did a thing called "secret sisters."  You got a girl on the volleyball team and you secretly encouraged her with small gifts and notes throughout the year.  It was really fun!  Well, my secret sister (hi Anna M.!) chose Reeses as her favorite candy (we all filled out a questionnaire so as to be accurate with our gifts) and so I went out and bought one of those eight packs at Wal-Mart.  After a couple games, and giving her three or four of them, I still had half the container in my dresser.  One morning, I was hungry, and was like, hey, I'll try one of these!
 
Oh.my.gosh.  Love at first bite.
 
(I still love anything that involves peanut butter being mixed with sugar.  Sweetened peanut butter is the bomb.)
 
I then ate the remaining four Reeses.  Yes, I ate all of my secret sister's candy.  Now that I say that out loud, it sounds bad.  I wish I had been introduced to Reeses in an admirable way.  Unless you eat this  Reeses, your friend will die!  It is your choice!
 
Er, no, we'll just stick with the real story.


Notes:  The chocolate topping is dairy free and only needs three ingredients!  The coconut oil solidifies at cold temperatures, so you cannot sub another oil for it.  Oh, and this does have sugar in it, but there is only a heaping 1/2 cup for 12 servings.  I think that is pretty good!  The graham cracker crumbs may be subbed for GF graham cracker crumbs, if you want.  Finally, healthy doesn't mean low calorie. :)
 
This has a stronger peanut butter flavor than a normal Reeses, but other than that, the texture and flavor are spot on!
 
Healthy Reeses Fudge
Recipe Source: The Sweet {Tooth} Life
Yield: 16 pieces
 
Peanut Butter Fudge:
2 tablespoons coconut oil
2/3 cup peanut butter
1 teaspoon vanilla
2/3 cup graham cracker crumbs
1/2 cup powdered sugar
 
Chocolate Topping:
2 tablespoons coconut oil
1/4 cup cocoa powder
2 tablespoons powdered sugar
 
Line a 9x9 pan with foil.  Lightly grease foil and set aside.
For the peanut butter fudge: Melt the coconut oil in a medium sized microwave safe bowl.
Stir in peanut butter and vanilla.
Add graham cracker crumbs and powdered sugar.
Stir until combined (mixture will be a little grainy, that is ok)
Spread into prepared pan.  Set aside.
For the chocolate topping: melt coconut oil.
Add cocoa powder and powdered sugar.  Whisk until smooth.
Pour over peanut butter fudge, spreading if necessary.
Freeze for a couple hours before serving.


March 11, 2014

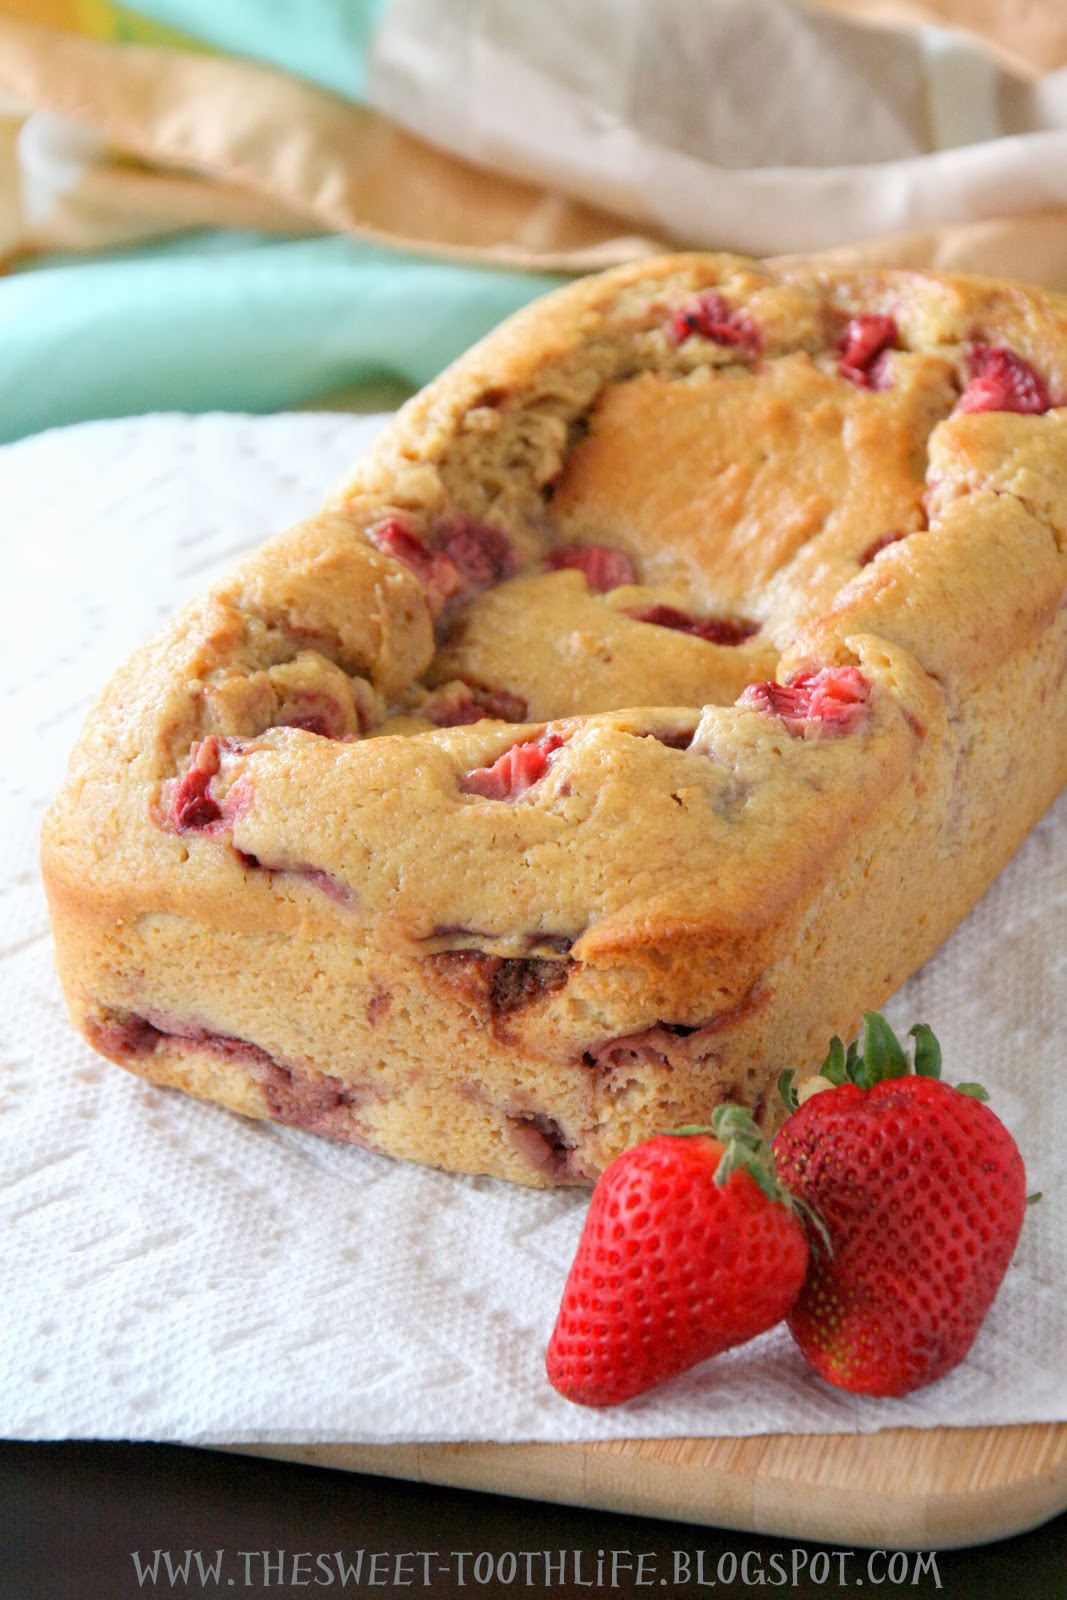
Strawberry Lemon Pudding Bread (whole wheat, dairy free)

No comments:
Pin It!
The Weather
0000 1st Sky
Universe 99999

To whomever it may concern,

My name is Mary Frances McNellis and I'm a high school junior.  I'm involved in sports, as are my brothers, and we really enjoy warm weather.  The recent temperatures of 75 were absolutely wonderful.  My athletic shorts haven't felt so loved since last year.  I was wondering if you could continue this stretch of spring weather for several more weeks?  It is March, and many people, including myself, have taken advantage of, and love, these warm temperatures.

I appreciate your time.  Thank you for considering this opportunity.

Mary Frances McNellis 


I've been writing letters to different businesses and people I would like to shadow this spring.  I never would've thought how difficult it would be!  Or maybe I'm just making things difficult.  I want to be formal, so they take me seriously, but at the same time, I don't want to sound like I want their job.  And I want to be personable.  It is a fine line and after more than a week of writing, having Mom rewrite it, then I rewrite it, then formatting, and more editing, they are finally printed and in the mail.  We'll see what happens!
 
 
But for reals, I am so excited about this warm weather!  Getting to wear athletic shorts again?  I know I will be sick of them by this July, but for now, I'm soaking it up.  Yesterday was super windy, so the volleyball tended to blow every direction, making it hard to practice.  If you are ever in the mood, try setting with a basketball.  Seriously, it works.  The basketball is heavy enough that nothing (except for a hurricane) is going to blow it off course.  And then today, it hit 80.  80 DEGREES!  Crazy, right?  But it was amazing, although being hot isn't the best.  It sure beats cold fingers and toes!  Being able to send everyone outside, without boots and snow pants, and gloves was the best. 
  
Another thing I love about warm weather is it means warm weather fruits are almost in season!  Like, strawberries, pineapples, blueberries, peaches, -> yes yes yes!  So, in honor of all that jazz, I made lemon strawberry bread.  Doesn't that sound amazing?
 
 
If you haven't noticed, I have a thing for pudding mix.  I love moist and soft things and since pudding mix guarentees those things, I enjoy tossing a box into whatever I'm baking.  This time, it happened to be bread.  If you haven't noticed, I also have a thing for bread.  But for the first time, I couldn't use Greek yogurt and I ALWAYS have used Greek yogurt.  It makes the bread (you guessed it!) moist and soft, and adds protein.  But since I couldn't use it this time, I turned to new recipe and added a couple things, including lemon pudding mix.  Some mixes aren't dairy free, so double check if that is a big deal.
 
Now, if you don't like the undercooked center in most quick breads, then you won't like this bread.  I'm giving you a fair warning, okay?  I hadn't planned on the pudding mix making the bread this soft, but it amazing!  And I personally am stuffing my face with it, but if that isn't your thing, omit the pudding mix, or find a different recipe. 

Now, if you DO like undercooked centers, then this is the bread for you.  The whole thing is on the verge of being categorized as undercooked.  Plus, the flavor combo of strawberries and lemon is bright and fresh and absolutely delicious.  My Mom especially liked this.  The lemon is really subtle and she admitted the strawberries paired with the lemons perfectly, even though she prefers her strawberries in fresh form and fresh form only.  If you want more lemon punch, add some lemon zest.

Letters in mail: check
Strawberries.: check
Lemon undertones: check
Moist and soft bread: check
Warm weather: pretty please!


Strawberry Lemon Pudding Loaf
Recipe Source: The Sweet {Tooth} Life.  Adapted from Williams Sonoma
Yield: 12 servings
 
1 cup whole wheat flour
1/2 cup +2 tablespoons all purpose flour
1/2 cup + 2 tablespoons sugar 
1 (4 serving) package instant lemon pudding mix
1 tsp. baking powder 
1/4 tsp. baking soda  
1/4 teaspoon salt
2 eggs
2 tablespoons lemon juice
1/2 cup almond milk
1/4 cup canola oil 
1 tsp. vanilla extract 
1-1/4 cup strawberries, diced

Preheat oven to 350.  Lightly grease loaf pan.
Combine flours, sugar, lemon pudding mix, powder, and soda.
In another bowl, beat eggs. 
Add lemon juice, almond milk, oil, and vanilla to eggs.
Pour wet ingredients into dry ingredients and stir until combined.
Fold in strawberries.
Pour into prepared pan.
Sprinkle reserved strawberries on top, if desired.
Bake for 55-60 minutes, or until toothpick inserted comes out clean or top is lightly browned.  *The back of my oven is hotter than the front, so I turned the bread half way through baking time.*
Let cool overnight before cutting and eating.

March 8, 2014

St. Patrick's Day Detox Green Smoothie

No comments:
Pin It!
It is Saturday!  Woot woot!  We had a busy weekend with Luke's end of the season basketball tournament.  It was fun, but it was a lot of driving!

In other news, Saint Patrick's Day is in a week.  Look at any food blog and you will see lovely recipes featuring the color green.


Look at my blog and you see ... cookies. 

And they aren't green.

My family is very challenged when it comes to this holiday.  Most Saint Patrick's Day recipes use mint, since green food is a lot more appealing when it is minty, or cream cheese, because cream cheese is great for food coloring!  Like, you can make it whatever color you want!  Brownies, er, not so much.  And cookies, either you use a two whole containers or you end up with the most disgusting colored cookie ever.  You think this is hypothetical.

And seriously, how am  Isupposed to celebrate?  I drink, but the smoothie type.  *lightbulb*

This green smoothie has no food coloring!  Or mint!  And it is still green!  My life as a food blogger is safe thanks to this recipe. ;)

 
I really like spinach.  I have always enjoyed it in salads, in lasagnas, on sandwiches, you name it, if it had spinach, I would probably eat it.  But I had never tried it in a smoothie and that had been on my bucket list for a while.  (Yes, I have a food bucket list ... it also has copycat Twinkies and Snickers on it, so don't think for a moment I sip on these all day, every day.  Haha! - no.)

I was absolutely shocked by how good this was.  You do not taste the spinach.

(let me repeat that)  You do not taste the spinach.

CAN YOU BELIEVE IT?


Yes, really, the spinach just makes this smoothie really green, which I was not counting on.  I mean, I expected it to be green, but not like ... this.  So if your family is anything like mine, kidnap, blindfold them, and threaten them with penalty of no Snickers for eternity, and then serve them a glass of this.  Trust me, it works this way.  This smoothie tastes like strawberries and bananas.  Sweet, creamy, and delicious.  End of story.

It looks like a tornado went through a mad scientist's lab, but hey, it tastes incredible! 


There are a couple tricks to keeping this smoothie creamy, like a milkshake (because I do not like smoothies I can drink with a straw.  I am a spoon girl all the way)  First off, you have to have frozen ingredients.  Of the three main ingredients (strawberries, bananas, and almond milk) two of those need to be frozen.  I've tried with all three, but then I needed a lot of almond milk to blend it all together.  So I would suggest sticking with just two.  For frozen almond milk, I just freeze a 1/3 cup of almond milk in an ice cube tray and then throw it in my Ninja whenever I'm ready.  For bananas, just slice them up and freeze overnight.  And strawberries - I just buy them in a huge bag.  All three of those are in my freezer at all times.  I've done this with blueberries and it is also amazing. 

Detox Green Smoothie
Recipe Source: The Sweet {Tooth} Life
Yield: 2 servings

1 cup spinach, not packed
1/2 cup frozen strawberries
1 large banana
1/3 cup frozen almond milk cubes
1/4 cup almond milk (EDIT: Orange juice also tastes amazing!)
1 tablespoon sweetener, optional

Blend in a good food processor.  And, yep, you are done!


March 3, 2014

Fudgy Carrot Cake Cookies

No comments:
Pin It!
 
Today's post is going to be short.
 
All you need to know will be summed up in the next 10 words.
 
Fudgy
 
Carrot Cake
 
Cookies
 
Whole Grain
 
Dairy Free
 
90 calories
 
 
These are amazing little cookies!  They are super soft, more so than my average cookie, which is why they earned the word fudgy in their title (an award usually given to brownies only!)
 
But they are still chewy, because we've got equal amounts of oats and whole wheat stirred in. 
 
And they are dairy free, because of two things.  One, coconut oil and applesauce in place of butter.  Two, enough cinnamon and spice to eliminate the need for baking chips.
 
Bam.
 
My whole family gave me so much flack over these.  I mean, you should have heard the fuss. 
 
"Don't tell me you are putting veggies in a dessert?  Seriously?"
 
Yes, seriously, because this doesn't taste like veggies.  This has 3/4 cup of brown sugar, relax.
 
And I'm not exaggerating when I say every single member of my family liked them.  From my Dad to my Mom to Luke to Abigail.  That is saying something.  You really don't taste the carrots, they just add moisture and texture.  What you do taste is the cinnamon.  And the chewy oats.  And that wonderful brown sugar.

 
Oh, and let us not forget that these cookies will not break the bank when it comes to your diet.
 
Note: I am not on a diet, but these recipes are most popular on Pinterest, so I make them.  Just for all my friends who will have questions after this goes live ;)
 
However, if you want a treat that will fill you up, satisfy your sweet tooth, and be ready in 30 minutes - all for 90 calories a cookie? 
 
Then this is for you.


Fudgy Carrot Cake Cookies (whole grain, dairy free)
Recipe Source: The Sweet {Tooth} Life.  Adapted from Averie Cooks
Yield: 20-22 cookies
 
1/4 cup coconut oil, melted
1/4 cup unsweetened applesauce
1 teaspoon vanilla
1 egg
3/4 cups brown sugar, packed
1-1/2 teaspoon cinnamon
1/2 teaspoon nutmeg
1/4 teaspoon ginger
1/2 teaspoon baking soda
pinch salt
1 cup whole wheat flour
1 cup old fashioned oats
3/4 cup carrots, grated, loosely packed
 
Preheat oven to 350.  Lightly grease cookie sheet.
Whisk together melted coconut oil, applesauce, and vanilla.
Beat in egg. 
Stir in brown sugar, cinnamon, nutmeg, ginger, baking soda, and salt.
Add flour, stir until combined.
Add oats and carrots.
Scoop onto baking sheet and place baking sheet in freezer for 10 minutes.
Remove from freezer and flatten tops of cookies slightly.
Bake for 10 minutes.
Let cool before serving. 
 

February 25, 2014

Vegan Flourless Peanut Butter Chocolate Chip Cookies

No comments:
Pin It!
IIIIIIIIIIII'm back!
 
And I brought cookies!
 
Oh, and I also changed the commenting system - let me know what you think PLEASE.  I won't mind if you hate it, it is still growing on me ;)
 
(Crazy long weekends call for enormous amounts of cookies.  Goes without saying.)
 
And not just any cookies - these are intensely peanut butter-y and studded with smooth dark chocolate.  Although they are small, they pack a powerful punch of the world's best combo - chocolate and peanut butter! 

 
Ever since I tried chickpeas in raw cookie dough, I couldn't wait to try a peanut butter version.  Now, I've attempted beans in baking before and it didn't work.  At all.  So I was a little hesitant to try again.  But these cookies are incredible - they might just be my all time favorite peanut butter cookies.  They are thick, but not fluffy, like some bean based cookies are.  These are dense and a little crumbly.  Each bite tastes buttery, without the annoying greasiness of oil.  And there is nothing in the way of the peanut butter flavor; oh, except for the bites of chocolate, but I can't complain there.  I'll let you in on a little secret -
 
these have no butter
 
or oil
 
or flour
 
and, even though I love eggs, there aren't on the list either. 
 
Vegan chocolate chip peanut butter cookies.  That taste like chocolate chip peanut butter cookies.
 
Totally and completely true.

 
I love mini things and I wish I could say it was for the cute factor.  I'm pretty sure I like them because I can eat three or four or ten.  I'm pretty sure I did just that with these.
 
They are that good.
 
No one will guess they are healthy.  You could eat them for breakfast!  But I really don't like the title breakfast cookies - it makes me think of oat and banana and applesauce.  Don't get me wrong, I really like all of those ingredients, but not when I want something for dessert. 
 
These are healthy enough for breakfast but really and truly taste like dessert. 


Vegan Flourless Peanut Butter Chocolate Chip Cookies
Recipe Source: My Whole Food Life
Yield: 16 cookies

1-1/4 cup chickpeas, cooked
1/2 cup peanut butter + 2 tablespoons
1/3 cup honey *maple syrup for strict vegans*
1 teaspoon baking powder
1/2 cup dark chocolate chips

Preheat oven to 350.
Drain chickpeas and rinse well with cold water.
Blend chickpeas in a good food processor.  (I used my Ninja)
Add peanut butter and honey and blend a couple times until smooth.  (Don't overblend or you'll "burn" your peanut butter)
Stir in baking powder.
Roll into balls; dough will be sticky, but that's okay.
Place on lightly greased cookie sheet.
Press chocolate chips on top of cookie dough.
Bake for 12-14 minutes (mine were done at 12 minutes)
Let cool for a couple minutes.
Serve warm (amazing!) or let cool completely (also really good!)

February 22, 2014

How to Make the Best Homemade Fudge Energy Bars (gluten, dairy, and cocount free)

15 comments:
Pin It!
Welcome to my no bake kitchen.  Because me and the oven have been best of enemies the past week.

 
(funny story about this photo - see the cocoa powder everywhere?  yeah, so I was trying to set a spoonful down on the cutting board, to look all professional, you know? and I lost my balance and flipped the spoon.  hence the cocoa powder everywhere.  my life story)

Ovens need time to heat up. 
Baking needs precise amounts of baking soda.
Cakes and cookies need planning ahead for prep work and cooling time.

Read:  Idonothavetimerightnow.  Or skills - obviously!

I tried a sponge roll cake.  I tried homemade bagels.  I messed up little details on both.  *faceplant*  I DID make these cookies and these cookies, but they weren't blog material because I've already posted them. 

So I stuck with what I know, however uncreative it may be.

No bake energy bites.

 
(don't you just want to finish that bite???)

I am in a not so creative rut right now (hence the lack of posts!)  But I have made these so often (I don't even measure anymore) and this last batch was so good I decided to go ahead and share it with you ... and since I didn't have anything else.

So today I'm going to break down why these are the best homemade fudge energy bites and how you can make them at home, too!


First up: the dates.  aka the key to refined sugar free energy bites.  Dates are the sticky sweetness that makes these taste like a dessert.  And without them, your energy bites will fall apart.  They contribute all of the wet ingredients that hold these bites together.  As for nutritional value, dates are a pretty good source of fiber, especially compared to honey and white sugar.

Next: the almonds!  All nuts, when blended enough, become like a butter.  I don't do that with the almonds in this recipe, but I blend them enough so that their natural fats create a thicker, firmer mixture.  Thanks to the almonds, these energy bites have a nutty, stick-to-ya factor.  You want to make sure you have at least 1:1 ratio of nuts to dates in these kind of recipes.  Otherwise, you will have a wet and sticky hot mess on your hands.  Trust me from multiple experiences.  And, almonds pack a big punch of healthy fats, and protein. 

Third on the list: oats.  Although oats have a bad rap thanks to clumpy lumpy bowls of oatmeal, these energy bites will have you taking back any nasty comments.  Instead of the traditional flour, oats are a hearty gluten free option.  They soak up any extra moisture, ensuring you don't have a wet and sticky hot mess described above.  They aren't usually used in Larabar or Clif bar copycats, but I like the chewiness that oats add.  Plus, they are a great source of fiber!

Finally, our choc-o-la-tay!  On to the goods!  Cocoa powder is an awesome substitute for flour in recipes where you want more chocolate oomph.  It serves the same purpose as the oats in terms of adding body to the energy bites, but it is obviously for the fudge factor.  When cocoa powder combines with dates, you've got a major fudge thing going on.  The rich and chewy fudginess is so darn good!  I use a hefty three tablespoons, but these aren't bitter (also learned from previous experiences) thanks to the dates and the ...

... Dark chocolate chips - don't you dare point to these little beauties and slam these energy bites as unhealthy.  Dark chocolate is good for you (or so I hear ... and tell myself as I eat half the bag) because of all those antioxidants.  (I honestly have no idea what they are but I hear they are good for me.)  And seriously, dark chocolate chips taste amazing. 


Blend those all up, with a little water to make it smoother, and roll into balls. 

Instant fudge gratification. 

These are some of my favorite things to make.  We're talking serious fudge truffles here!  When I want chocolate, I don't want to wait 45 minutes for brownies.  Now I don't have to.  These satisfy my random chocolate fixes in five minutes AND keep me fueled all morning and afternoon ... and afternight. 

In. Love. 

Homemade Fudge Energy Bites
Recipe Source: The Sweet {Tooth} Life
Yield: 12 bites

1/2 cup pitted dates
1/2 cup slivered almonds
1/3 cup oats
3 tablespoons cocoa powder
1/4 cup dark chocolate chips
Water

In a good food processor (I used my Ninja) blend the dates with 3 tablespoons of water. (It is okay if they aren't super smooth)
Add almonds and oats and blend again.
Add cocoa powder, chocolate chips, and 1-2 tablespoons more water.  (Start with 1 tablespoon water and if you need more, add the second tablespoon.)
Roll into 12 balls.
Enjoy healthy fudge bliss.
If you have any, store leftovers in refrigerator.

February 16, 2014

Flourless Lemon Cookie Dough Truffles

28 comments:
Pin It!
I'm late to the Valentine's Day party.  Sure, I made some pink foods, but I missed the day completely.  So, even though this is late, I hope you all had a wonderful Valentine's Day!  Something I've realized is that whenever there is love, there is always conflict.  How many times do we see conflict?  Like, all the time, right?  I've always had conflict between cookie dough and the flavor lemon.  I've never made lemon cookies.  Or lemon cookie bars. 

But now I've made lemon cookie dough truffles.

Absolutely no conflict there.

 
I've never had cookie dough that didn't have peanut butter or chocolate  so this was a totally different sense for my taste buds.  Cookie dough that was tart!  The truffles have the texture of cookie dough, but more textured.  The oats and the beans create a dryer texture that is balanced by the lemon juice and honey.  So it is still moist and thick, but has the sweet and sour that we all know we love, even if we won't admit it. 

These will have you singing your praises, no matter what your former preconceptions of lemon cookie dough might be.  Or cookie dough made from beans.

Ok, yes, these are not your normal truffles.  But you really can't tell, unless you are really looking for a different texture.  The flavor is unaffected, but it is a little more textured.  These truffles aren't completely smooth, but I like having a little chew in my cookie dough.  Between the oats and the beans, these are packed with fiber and protein.  If I worked out, these would make a fantastic post workout snack ;)  And if you are like me, they make an incredible "I'm hungry and want something sweet while I'm reading a good book" snack.  I've eaten almost the entire batch, with a little help from my siblings.  It is hard work sharing amazing little cookie dough truffles like these.  *pops another in mouth*


Conflict - I feel like I've had way too much of it this past week.  There will always be things I don't agree with, but this week, I've seem to run into my fair share.  I'm grateful we live in a country where we have the freedom to agree and disagree and I'm grateful God made us differently.  If we were all the same, we would never learn anything new.  But sometimes, I wonder how other people don't see things the way I see them.  Life isn't as black and white as I believe (I'm incredibly black and white ... it has its advantages and disadvantages)  I get that.  But being open minded and gracious are not my strong points.  I read a couple years ago how any conflict is the opportunity to choose the right thing.  I always seem to remember that after I say the wrong thing, but no matter how I act, it is still true. 

God has really been showing me that He had to endure all sorts of conflict while He was on earth.  I mean, look at His interactions with the Pharisees.  Could there have been more annoying people?  They were constantly creating grey areas into black and white areas and vice versa.  Yet He treated them with grace.  Even if He was pointing out their error, He was doing it in love.  I know I have the power of Christ to treat people with love. I don't like choosing to.  But if I can make cookie dough out of beans, and make cookie dough lemon flavored, then I can choose to love people, despite the conflict I find unavoidable. Christ's love is based on unconditional love and I can't make the love He gave me conditional simply because I don't want to.  I'm sure being crucified wasn't on Jesus' "want to" list.  But He did it because He loves me.  *sigh*  I have no right to go to death over things like sports or end of the year parties.  What is important is being gracious and loving.  I want to be remembered for that, not for being right.  Valentine's Day is a wonderful reminder that love is true love is selfless and gracious, no matter what.

Flourless Lemon Cookie Dough Truffles
Recipe Source: The Sweet {Tooth} Life
Yield: 14 truffles

1 can chickpeas (garbanzo beans)
2 tablespoons lemon juice
2 teaspoons lemon zest
3/4 cup oats, ground into a flour
1/2 cup sweetener (I used 1/4 cup honey and 1/4 cup white sugar)

Drain and rinse chickpeas.
Blend chickpeas with lemon juice and zest in a food processor until smooth.
Add oats and sweetener and blend again. 
Scoop into one tablespoon balls and place on a lightly greased baking sheet.
Freeze for 10 minutes.
Remove from freezer and place in refrigerator for 30 minutes. 
Put truffles in an airtight container and store in refrigerator. 

Notes:  The truffles are stored in the freezer first to firm up the dough.  Then they will be fine in the fridge.  You can't continue to store them in the freezer or they will be too hard to eat. 

February 9, 2014

Whole Wheat Fresh Cranberry Muffins (dairy free)

29 comments:
Pin It!
I've been baking muffins like crazy this week!  After several failed cinnamon roll recipes, I decided to stick with what I could do.  I can do muffins!  Better yet, I can do skinny muffins. But cinnamon rolls? … meh, we are still working on that.

These are the second or third batch of muffins I've made this week and these cranberry ones are the best.  And I mean, the best.


I've said this before, I'll say it again:  I will take muffins and sweet breads over cookies any day of the week.  There is something about quick breads and muffins that I just love.  The dense crumb, the moist bread, the fluffy middle - it is my happy place.

(Sprinkles are my happy place, too)


My first batch tasted great, but really dense.  I didn't have enough oil or baking powder to give the muffins that lighter crumb. 

This time around, everything was just right!  Everyone gave these 10 out of 10 ... except for those who didn't like cranberries.  They said the muffin itself was delicious, they just don't care for cranberries.  If you aren't the biggest fan of cranberries, feel free to sub blueberries, chocolate chips, or even raisins.  Whatever you use, these are the best 100% whole wheat muffins I've ever made.  And this combination of coconut oil, soy milk, and applesauce bakes up the most moist and tender muffins I've eaten.  So, these are not only the best 100% whole wheat muffins, I've ever had, these are the best dairy free muffins I've ever had.

 
They're the best ever - period.


I personally love the bright color of the cranberries, and the tartness they add.  They're so pretty and brighten any rushed morning, especially these grey snow days.  Trust me from experience, they make grab-and-go breakfasts easy and delicious.


Whole Wheat Fresh Cranberry Muffins (dairy free)
Recipe Source: Adapted from Serena Bakes Simply From Scratch

1/4 cup coconut oil
1/2 cup applesauce
3/4 cup soy milk
1 teaspoon vanilla
2 eggs
1 cup sugar
2 cups whole wheat flour
1/2 teaspoon cinnamon
1/2 teaspoon salt
1/2 teaspoon baking soda
1/2 teaspoon baking powder
1-3/4 cup cranberries + 1/4 for topping (I used fresh cranberries, but frozen works well, too!)

Preheat oven to 375.
In a large microwave safe bowl, melt coconut oil. 
Stir in applesauce, milk, and vanilla.
Whisk in eggs.
Add sugar, stir until dissolved.
Add flour, cinnamon, salt, baking soda, and baking powder.
Stir until incorporated.
Chop cranberries in half and add to batter.  Fold in gently.
Divide batter between 12 greased muffin cups.
Press reserved 1/4 cup halved cranberries on to tops of muffins.
Bake for 25-27 minutes.
Let cool.

Notes: Freezer friendly!  And did I mention these muffins are the best ever? 

DMCA.com Protection